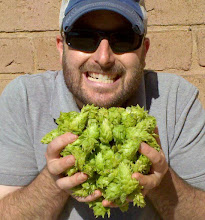
Wednesday, May 28, 2008

Hop Farm, May 27 2008

I was at the hop farm yesterday evening and everything seems to be doing fairly well. There's something that's enjoying chewing on the vines, especially new growth. Rabbits have been sighted in the area so that's a distinct possibility. The top row (chinook and centennial) typically always reaches the top wire first.
Below is the end of the top row. This is the centennial hop that tends to grow best. It has just started to flower so this should be a good season for centennial. Notice the next hop mound next to the pole that doesn't have a vine long enough to train yet. I'll be checking up on them in a couple of weeks.
Below is chinook! As always, this hop loves it here and starts its season already producing. It should be ready for a first harvest mid July. I can typically continue harvesting until October from these vines. The bottom row is having difficulty establishing itself mainly due to some pest that likes to chew on the first vines.

Monday, May 26, 2008

IPA, May 26 2008


IPA - Brewed May 26th, 2008


5 Gallons, All Grain, Step Infusion Mash, 90 Minute Boil

11lbs. Domestic 2-Row
2lbs. Franco-Belges Munich
1/2lb. Caravienne
3oz. Black Roasted Barley

1.75oz. Homegrown Whole Chinook 60min (everything else is from pellets).
1/2oz. Horizon 11% 30min.
1/4oz. Amarillo 7% 20min.
1 Whirlfloc Tab 20min.
1/2oz. Amarillo 7% 5min.

White Labs, California Ale Yeast

Pictured to the left is the new chiller setup. After the wort drops below 100'F, I start the pre-chiller. Water from the tap enters the first immersion chiller surrounded by ice water. Along with the newly constructed 50' chiller, this setup significantly decreased the time it took to bring the wort under 80'F.

Sunday, May 25, 2008

Dusted: The Macallan Fine Oak 10

Finishing a bottle of The Macallan Fine Oak 10 this evening. I'm a fan of scotch, mostly single malts. I'm never dissapointed with Macallan, though they are more expensive than most. The fine oak has great flavor contributed from bourbon and sherry oak casks. I prefer having my scotch neat and though a tad young, the Fine Oak is very light with a great blend of oak and malt. A sip of water brings out the sweetness and complexity of the oak. A dusted bottle means that a replacement is in the future!
Sent from my mobile phone.

Asmara Lager Beer

My wife wanted an adventure to East Africa so we headed to East San Diego! This Eritrean restaurant was very traditional. The food was served as curry-like sauces on these huge pancakes. Using the pancake as a utensil, you scoop or dip everything.They had a couple of East African Beers on the menu so we went for the Asmara Lager. It was light and refreshing pilsner style beer that not necessarily complimented the type of food. The malt flavor is evident of adjuncts but I couldn't quite pinpoint what it might have been. The body and carbonation was on the lighter side as well as the aroma and hop flavor. My wife loved the food so I'm sure we'll go there again. Next time, I'll try the other brew.

Saturday, May 24, 2008

Hang Loose Tap Handle

I found this on eBay! This is a Hawaiian carving stated to be from the 60's. I drilled a 1/2" hole in the bottom and installed a threaded insert. eBay has many carved gems that are very inexpensive relative to purchased tap handles. Its also the best place to find used commercial tap handles.

Circa 1960's Hawaiian Hang Loose tap handle.

On the far left of the image below is another example of a cheap but unique tap handle. The tiki figure was picked up at a Hawaiian swap meet for about $2. Soon, I'll replace the oar paddle with a ukulele for a complete Hawaiian tap handle theme.
Mostly a Hawaiian themed tap handles.

Making a New Immersion Chiller

I'm having some chillindamos issues! I've been using the same wort chiller since my extract days. The chiller was really designed for a five gallon pot but it really was inadequate when I upgraded to my 9 gallon kettle. It took longer but got the job done. The problem really occurs during the summer months when the tap water is significantly warmer. During that time, chilling wort from boiling to around 80'F could take more than 2 hours.

I was hoping that building my own would be a fairly inexpensive solution. I considered purchasing a counter-flow or plate system but cost and practicality in an apartment persuaded me that an improved immersion chiller would be more ideal.

Making your own used to be very inexpensive but recent price increases in metals have made this an expensive project. I opted for 50 feet of 3/8 OD copper tubing. 50 feet will provide lots of surface area for heat exchange. I'd have to find the receipt, but I think the copper tubing was $60. Other brewers have reported paying around $20 a while ago.

Using a spring bender and a cornelius keg, I shaped the tubing cylindrically. The spring bender, I learned, is more for short angle bends. I still experienced some crimping for steeper bends. This is not really a problem since the flow rate going through will be slow.

Making the final bends was challenging but I finished the project under an hour. My kettle lid is notched so the greatest challenge was making sure both tubes exited in that exact location while leaving the coil centered in the pot.

Lastly, I need to clean the new immersion chiller with a solution of vinegar to prepare it for tomorrow's brew test.

During the summer months, the old chiller will be put back to use as a pre-chiller. After the wort temperature drops below 100'F, the tap-water will enter the small chiller first. This chiller will be immersed in an ice bath to pre-chill the water before entering the kettle chiller. I'm hoping that this combination will be more efficient during the summer. Here's to wort chillindamos!

Corneius Keg Plastic Replacement

I split a 4-pack order of corny kegs recently. Buying them individually can get expensive, especially with shipping costs. Now, I have more than enough kegs - 12 five-gallon kegs. Though they shipped with o-ring replacements, we got two kegs that had plastic tubes for the gas-in side. Often, old o-rings and plastic have odors retaining from the keg's former use (often soda). Plastic can have other issues including harboring bacteria.


Before use, we ordered replacements (unsure of metal type). William's Brewing has a great selection of replacement parts for kegs. The problem was that the new tube would not fit in the keg. This particular keg seemed to be machined for the plastic style tube.


No problem, just need to drill out the excess to make it fit. The drill bit is about the same diameter as the tubing, maybe a bit larger. Since an o-ring seals the top, there's no need to drill for a snug fit. After drilling through, I switched to high speed and ran the bit through the hole to clean it up. The tube fits just right.
Any new keg, I spend the time doing a thorough cleaning typically with dish soap and scrub brushes. All fittings are inspected, cleaned, and sanitized. I also lubricate all o-rings and poppet valves with keg-lube. The rubber handles and foot is sprayed with silicone. Lastly, I leave a solution of iodophor in the keg along with CO2 so they keg is ready for a brew in the near future.

Sunday, May 4, 2008

La Jolla Ice Tea Cocktail

We crave cocktails! We have yet to find a perfect bartender in San Diego. Actually, I've yet to experience anywhere that I can depend on consistency, quality, and well-crafted cocktails. If you want a quality drink, you simply gotta make it yourself!

My wife and I shop Trader Joe's on a regular basis. They're our primary grocery store while most treat them as a specialty grocer. As far as alcohol is concerned, they have outstanding deals on spirits and wine (yes, they've got beer too though I rarely buy bottled beer), but what truly stands out is their juice isle. You heard that right, juice!

TJ's despises high fructose corn syrup and so, much of their juice is the real thing. When sugar is added, TJ's uses cane sugar rather than that syrup crap that plagues most juices and soft drinks. The result at TJ's is a myriad of juices suited for cocktails!

One day, I discovered the organic tea and lemonade and thought, "hmm, an Arnold Palmer would taste good about now, maybe with some vodka."

Got home and opened the liquor cabinet to make a new concoction with TJ's Organic Tea and Lemonade and the La Jolla Ice Tea was born. Here's the rough recipe:


La Jolla Ice Tea:

(I use visual proportions for mixing)

  • Fill glass with ice cubes.
  • Vodka (your choice) 1/5 glass full.
  • Tommy Bahama White Rum to about 1/2 full.
  • TJ's Organic Tea and Lemonade to just shy of a full glass.
  • Mix well (or use a shaker).
  • Float Grand Marnier on top.
  • Mint garnish.

Saturday, May 3, 2008

Avanti Wine Chiller

Collecting and storing wine was the next natural step for my wife and I. We've been fans since our college days at UCSB where we frequented local wineries and tasting rooms. From there, it grew to more tasting adventures and learning about wine.
We've had our wine chiller for almost 3 years now and we're finding it difficult to keep it stocked! The WC5100BG model has a single temperature zone and holds 54 standard bottles.


We keep the temperature zone for reds since we will not be keeping whites for very long. Since we live near the ocean in Southern California, keeping humidity in the chiller is never a problem. In fact, it is too humid in there! Though the excessive humidity does not cause water build-up, it does wrinkle some bottle labels. I've considered placing a small dessicator in there but don't want it to get too dry!


As with most chillers, standard bordeaux bottles easily allow the 54 bottle capacity. The top rack is the only location in the chiller where larger width bottles can comfortable snug together. We keep champagne and bigger chardonnay bottles on the top shelf only. While possible to squeeze these bottles in the other locations, they will prevent easy sliding and cause warping to the wooden racks. Non-standard bottles work but you do have to shuffle bottles around constantly to make it work.


Eventually, we'd like to have this chiller built-in to a kitchen where we'll keep our casual and entertaining wines. This model can be used as a stand-alone or a built-in unit. Later, long-term storage will be kept in a larger chiller or a cellar (think big!?).


When we bought this chiller, we stocked it with everything we had including purchases during a recent wine tasting vacation. We also made a trip to the store purchasing some "nice" bottles and casual drinkers. On the most part, we've been keeping it full. Occasionally, we've been buying bottles to age for 3-5+ years. These bottles rest on the bottom racks. Over 3 years of having the chiller, great wine now occupies much of the bottom racks. Recently, there hasn't been much room for casual wines, but that's certainly not a bad thing! Keep it chillin, chillindamos!


Thursday, May 1, 2008

Rascherry Wheat 21

My sister-in-law is turning 21 in a month. She's helped with the hop farm quite a bit and is well deserving of some homebrew. Looking in the fridge to see the flavorings I had available for a fruity-wheat crowd-pleaser, I sent a text to sis to ask if she wanted raspberry, cherry, or both. So here's Rascherry Wheat, Happy Birthday Caroline!

Rascherry Wheat 21
5 Gallons, All Grain, Single Infusion Mash, 90 Minute Boil

7lbs. Domestic Two-Row
6lbs. Belgian White Wheat

3/4oz. Hallertauer 60min.

White Labs, California Ale Yeast
Primary Ferment 10 Days
Secondary Ferment 10 Days
Raspberry and Cherry Flavoring to taste during kegging

My brewing system is perfect for indoor sparging!

A heat wave just hit Southern California so I'm using a water bath (with periodic ice cubes) to maintain ideal fermentation temperatures.

This is what prevents me from making too many wheat beers. I need to use a blow-off tube to prevent blow-outs from wheat fermentations. This thing will clog with the yeast cake and it is a huge pain to clean out. I typically use only a plastic airlock but wheat beers will blow right through those. Caroline's lucky I like her!

UPDATE (5/24):
The weather in Southern California has been wild from record heat to cold rain. In secondary, I kept the carboy in a water bath with a towel wrapped around it. This has kept temperatures consistent. Tomorrow, the batch will go inside the kegerator for chilling and settling before kegging. The birthday celebration will take place next weekend.

Making a Yeast Starter

My wife keeps my yeast as frozen stock in her laboratory. With a few days notice, she pulls a loop from the frozen stock and reinstates them in an agar plate. From there, she scrapes the yeast from the plate to a glucose vial.
In two days time, she brings home the vial to step-up to a 1L starter. This time, she also brought home the yeast plate to scrape for more cells.
Not many homebrewers have a PhD in the house to do this kind of stuff. It certainly saves cost per batch and it is very convenient!
I use a wide-mouth 1L erlenmeyer flask to step-up the yeast count and increase viability for pitching. In the flask are a few hop pellets, a pinch of yeast nutrient and a magnetic stir bar. The wide-mouth flask and a few hop pellets help reduce the chance of a boil over. In a measuring cup is 1/2 cup of dried malt extract and filtered water. I warm this up to near boiling in the microwave. This also helps reduce the chance of a boil over.
Together, I find 850ml to work best. 900 gives me less time to take preventative measures if a boil over is occurring (are you getting the theme here yet?). The largest challenge is bringing it up to a boil very carefully. When the wort begins to boil, ease off the heat to medium and allow to boil for 20 minutes for sterilization. (Excuse our gross college stove! I'm sure a little of that comes from boil-overs from yeast starters but mostly from my lovely makinamess wife!)
After 20 minutes of boiling, I immediately cover the flask with aluminum foil and allow to cool on the stove top for about 5 minutes. I then immerse the flask in cool bath of water until room temperature.
When the flask is room temperature, I pitch the entire contents of the yeast vial in the flask and allow the stir plate to provide oxygen and consistent yeast-to-sugar contact.
24 hours on the stir plate turns the starter color from a malty brown to a yeasty beige, ready for pitching and immediate fermentation. I always place a damp towel between the starter and my stirrer since it generates a bit of heat.